A quick intro to pipelines
A pipeline is basically a script, which is run in a clean VM image to build your software. The Azure-pipelines service takes care of spinning up the VMs and running the script whenever your code changes. The initial setup is rather straightforward, once you have a repository hosted on Azure DevOps. All one needs is an azure-pipelines.yml file in the root of the repository which describes how to build the software. This file is a YAML formatted file somewhat similar to the configuration files used by other cloud CI services (Travis, Gitlab, …). The file describes a list of so called jobs, where each job describes how to run a particular build. Typically, one has a separate job for each supported OS platform and e.g. a job to build documentation. The jobs are independent of each other and are run by the service in a clean VM image (specified by the vmImage property of the pool property of job). Each job consists of a series of steps which are run serially. The steps can either be Bash/Command scripts or so called tasks which are predefined scripts (implemented in JavaScript and run in Node.js) for common operations. There are also special steps for checking out source code, storing job artifacts and other actions, but that is not important. A bare-bones configuration might look as follows:
jobs:
  - job: Windows
    pool:
      vmImage: 'vs2017-win2016'
    steps:
    # Check out the source code
    - checkout: self
      clean: true
      submodules: recursive
    # Create a build directory and configure the project using cmake
    - script: |
        cd $(Build.SourcesDirectory)
        mkdir build
        cd build
        cmake ..
      displayName: 'Configure the build'
    # Build the project
    - script: |
        cd $(Build.SourcesDirectory)/build
        cmake --build . --target all
    # Store the executable created by the build so that it can be downloaded
    # later
    - upload: build/main.exe
      artifact: main-win
The problem
All this is pretty straightforward. The problem comes when something fails. The jobs are run in clean VMs which are inaccessible from the outside (no ssh-ing inside to debug problems) and are destroyed after the job finishes (either successfully or with an error ). The only thing that is preserved and available is the console output of the script. Debugging a problem then becomes a matter of:
- changing the job definition in
azure-pipelines.yml - committing the changes and pushing them to the azure repo
- waiting for the pipelines service to spin up a VM and run until an error occurs (depending on where the error occurs, this might take anywhere from a few minutes up to an hour)
- trying to guess what went wrong and how to fix it from the logs
As you can imagine, this is not a fun or productive experience. It would be much nicer to be able to spin up the VMs ourselves, ssh into it, run the build and debug the errors interactively. And this is exactly what we have done.
Running Azure Pipelines Locally
Ideally, we would like to have a setup, where we have a VM mimicking the azure environment with a copy of our code which we can ssh into and run our build. Any changes which we make to the code would propagate into the VM, however, any changes inside the VM would not affect our code. This would allow us to have a safe environment for experimenting with the build. Moreover, if we came across an error, we could fix it by changing the code and continue with the build without rebuilding everything from scratch.
This would be relatively easy to setup with Docker containers using overlay mounts to mount the code into the container. Luckily, Microsoft uses packer to build the VM images which run the builds and has published the build scripts for these images. Since packer supports building Docker images, it is straightforward to adapt the scripts for our use case.
Once we have an appropriate docker container, we can mount our code inside, and run the build. Since we want to mimic the azure build process as closely as possible, it would be ideal to run the build automatically based on the contents of azure-pipelines.yml. It is relatively simple to convert this file into a series of shell scripts (one script per job) which can run inside the container. The only problem is with converting the task steps. Again, we are lucky that the source to the tasks is publicly available. They can thus be packaged inside the docker container and, with a bit of poking around, it is not too hard to figure out how to run them.
The result — Azure Builder
Hoping that it might be useful to other people as well, I’ve put the collection of scripts to build the containers and run a pipeline inside them into the azp-local repository on gitlab. Currently, it only works on unix (it depends on the availability of OverlayFS) with the azure Ubuntu images (can’t run windows containers on unix). I will close this post with some instructions on using the scripts.
Installing azure builder
First make sure docker and make is installed on the machine you want to run your pipelines. Then clone the azp-local repository and install packer into the ./bin subdirectory:
git clone https://gitlab.com/Verner/azp-local.git
git submodule update --init --recursive
cd azp-local
make install-packer
Next generate a new github access token which allows reading a list of releases from a public github repo (don't ask me). This can be done from the Developer settings:
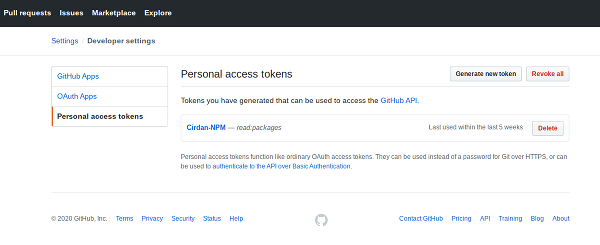
and save it to .packer-vars.json in the repository root, under the key github_feed_token.
Now use make to build a docker version of the original azure VM:
make build-orig-ubuntu-1804
(this will create a docker image tagged jonathanverner/azure-images:ubuntu-18.04-v0.1). Next we need to bundle the pipelines tasks with the image. This is done by creating a new image, again using make:
make build-azp-local-ubuntu-1804
(this will create a docker image tagged jonathanverner/azp-local-ubuntu-18.04:0.1)
Note: Since the images are quite heavy, building them might take anywhere from 10 minutes to 10 hours, depending on your internet connection and machine specs.
Using the builder to run your builds
Running a build should be as easy as navigating to the root of your repo (where the azure-pipelines.yml file is located) and running:
$AZP_LOCAL_REPO/azp-local-run.sh $PWD jonathanverner/azp-local-ubuntu-18.04:0.1
where $AZP_LOCAL_REPO is the path to the builder repo you cloned above. This should do the following:
- spin up a docker container where the build will run
- mount the repository as
/srcin the container; this mount is done in such a way that changes outside of the container are visible in the container, but changes inside the container are not visible outside — i.e. your repo can’t be modified by the build process - create & mount
./.azp-local/artifactsand./.azp-local/logsas/artifactsand/logsin the container respectively; these mounts propagate changes both ways (i.e. changes inside the container are visible outside and vice versa) - convert the
azure-pipelines.ymlconfiguration into a runnable bash script/src/run-Ubuntu.shwhich will drive the build process - drop you into a bash shell in the container and print out some basic help
You can now try to run the build by executing cd /src && ./run-Ubuntu.sh. The output of the build script will be saved in /logs. The build script is split into subscripts corresponding to the tasks defined in azure-pipelines.yml. You can list these tasks by running ./run-Ubuntu.sh list and you can run individual tasks by running ./run-Ubuntu.sh run TASK_ID.
Note that once you exit from this shell, the container will be killed and all changes to/src will be lost. If you have a build running in a container and want a new shell inside the container, this is done by running in the VM:
$ docker exec -it CONTAINER_NAME /bin/bash
where CONTAINER_NAME is the name of your container (which is printed on the prompt in the shell you were dropped into when you started the container). The container typically also has a user friendlier name (see, e.g., docker ps)
Dealing with artifacts Since our container does not have access to Microsoft’s infrastructure, it can’t download pipeline artifacts. If your job needs to download some artifacts (if, e.g., the steps contain the DownloadPipelineArtifact task), one needs to download them manually and them into the .azp-local/artifacts directory where they will be found by the build process.
Dealing with secret files As with artifacts, secret files need to be downloaded manually and put into the .azp-local/secrets or ~/.config/azp-local/secrets directory where they will be found by the build process.
Dealing with build variables Azure pipelines allows one to define variables from the web interface which are available to the build job. These variables can be protected and can be used to store, e.g., API keys, passwords and other sensitive data. Our container of course can’t access them so if your pipeline needs them (e.g. one of the jobs contains a variables key) you need to provide them. The script will load them from the json file variables.json located in .azp-local/secrets or .config/azp-local. This is a simple file containing a list of variable groups. Each group has a name key specifying its name and a variables key which is an object, whose properties are the variables. The variable name is the property name and its value is stored under the value key, e.g.:
[
    {
        "name": "signing",
        "variables": {
            "GPG_PASSPHRASE": {
                "value": "most secret passphrase"
            }
        }
    }
]
The file can also be created using the az command-line client:
$ az login # Log in to azure
$ az extension add --name azure-devops # Install the dev-ops extension
$ az devops configure --defaults organization=https://dev.azure.com/technologynexus/ # Configure the dev-ops extension
$ az pipelines variable-group list --project $PROJECT_NAME > .azp-local/secrets/variables.json
Debugging failing tasks The script which converts azure-pipelines.yml into a bash script sometimes doesn’t do a good enough job for a specific task; sometimes it does, but the task itself is broken in our setup; In that case it is useful to be able to debug the tasks. This can be done as follows. Say we want to debug the CMakeV1 task. First, we need to install a debugger in our container:
npm i -g node-inspect
Then we run the task under this debugger as follows:
SYSTEM_DEFAULTWORKINGDIRECTORY="/src" BUILD_SOURCESDIRECTORY="/src" AGENT_TEMPDIRECTORY="/tmp" AGENT_WORKFOLDER="/src" INPUT_VAR1=VAL1 ... node inspect /azp-tasks/CMakeV1/cmaketask.js
where the environment variables provide inputs to the task (each input in azure-pipelines.yml corresponds to an INPUT_VARNAME environment variable, where VARNAME is the uppercased version of the name in azure-pipelines.yml with spaces and dots . replaced by underscores _). Some global variables will also typically need to be defined.
To get the contents of variables in the debugger, one needs to first drop to the repl shell using the repl command. To continue with debugging, Ctrl-C exits the repl shell.